I can't leave you with the disgusting last image of my trash can mess any longer. I need to share something beautiful. So, I give you my current projects...aka the reason I haven't posted sooner.
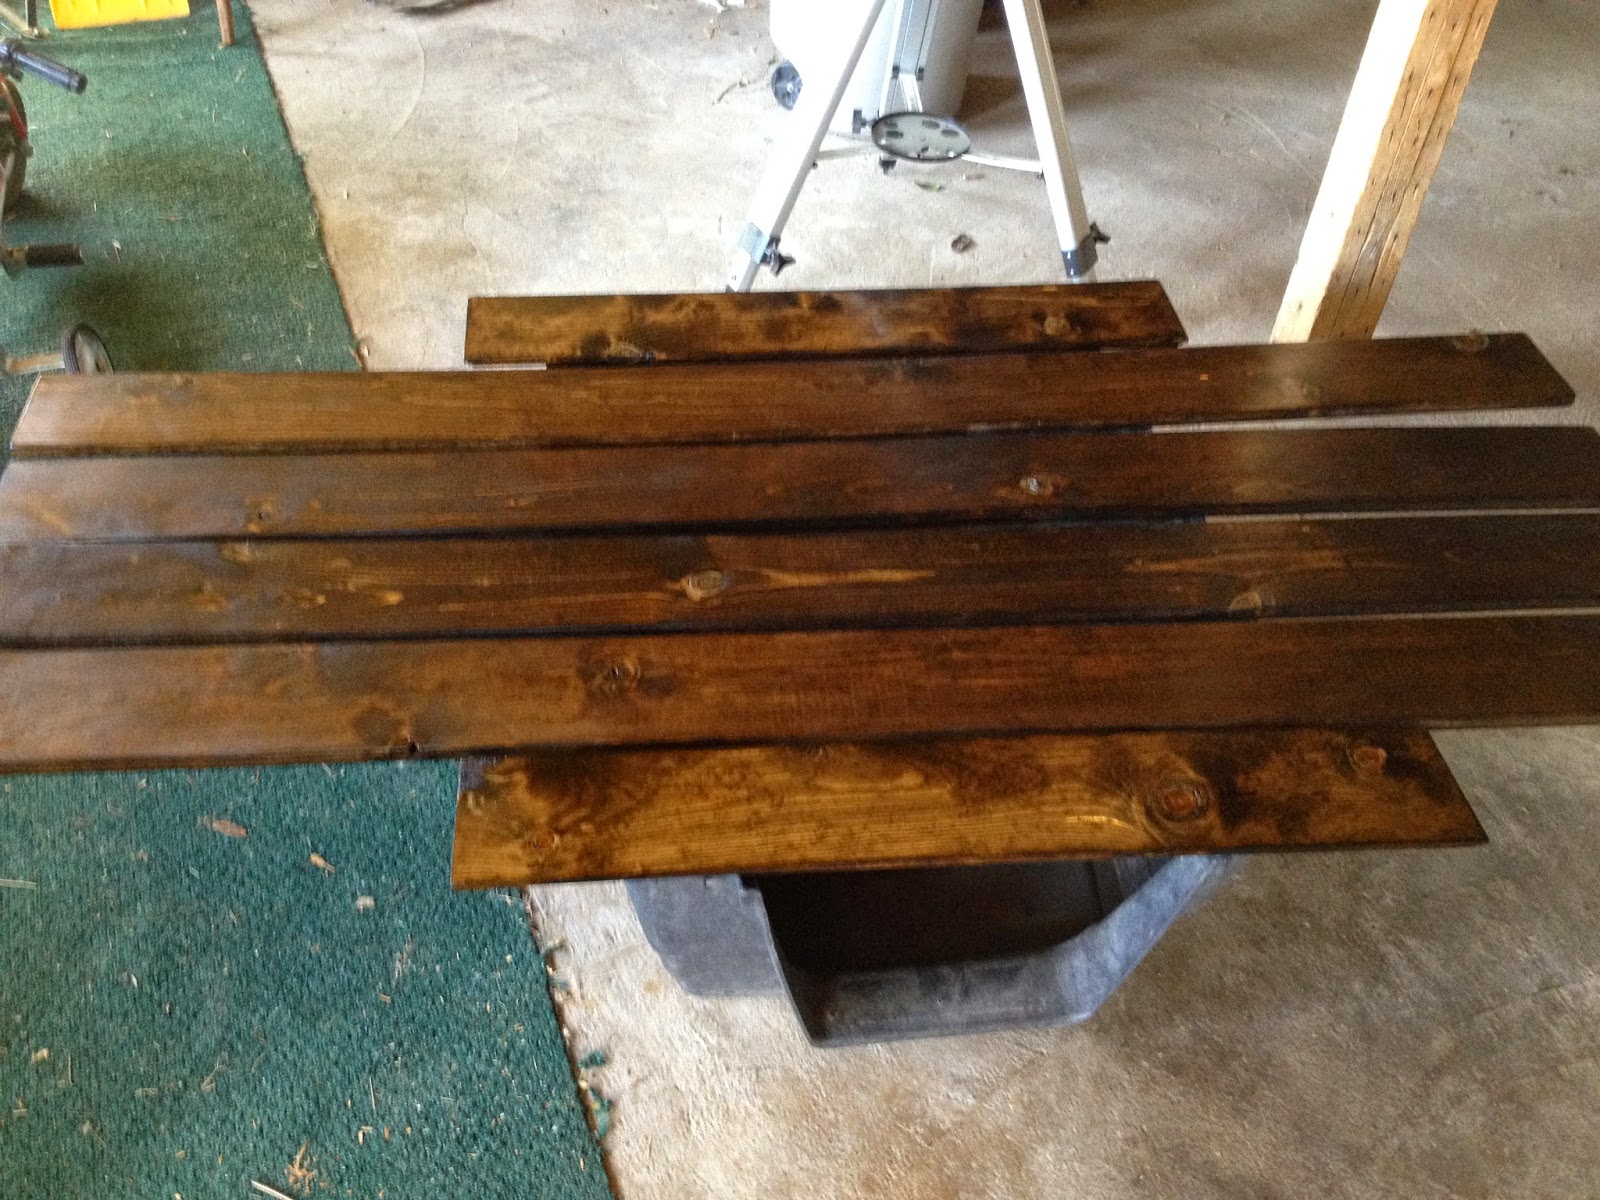
First, the wood project. These are actually for two projects. The longer boards are to replace the seating around our fire pit in the back yard. The original boards were so old and weathered that they splintered and my son finished off the job with a small sledgehammer, as seen below.
The plan was to simply stain and polyurethane some new boards and screw them into the previously utilized stumps. However, if I do this, it will be temporary because I have convinced myself to go ahead and find plans to build a prettier base/legs for the benches. Just need to find the time, plans, and patience to do more staining and poly on the legs.
The second half of this project is the shorter boards. They are the backing for the new coat hooks I'm putting up in our mudroom. And it's about time...the mudroom was redone months ago. So, with the winter months coming up, we will have an organized dumping ground space for our coats and bags.
Next, is painting my living room. I have been putting this off for two years a while because of the area you can see in the back of the pic. That area above the stairs. Yeah, I will need to use a ladder on the stairs to reach the high areas and detailing. And I have a thing with heights. A fear thing. I know I probably won't fall, but whenever I have to use the ladder to get high, especially on these stairs, I break out in a cold sweat and get really shaky. Even the thought of it is a bit much.
So, I have decided to break this project into sections. I am doing one half of the room, then the other half, THEN the stairs section absolutely last. This is also to help my husband not be too overwhelmed with the chaos that all of this brings.
I will post final pics of both these projects when completed for a final reveal. Until then, be glad you don't have to stare at my trash anymore. I know I am.
I have a dirty secret...under my kitchen sink.
It's gross, embarrassing, stinky.
Brace yourself.
It's where I keep my trash can.
I admit that I haven't cleaned this out much at all since moving in a couple of years ago. And it's been made worse by a few under-sink leaks that are now remedied. But you know what you get when you mix trash and water? A sticky, stained, warped mess.
I had to tackle it so I wouldn't have to cringe and hold my nose every time I opened it to throw something away.
First, hot water and a scrub brush. I scrubbed and wiped the bottom, sides, doors, and top until all the ickiness was gone. But, I was still left with some stains, the warping, and now some spots where the paint was rubbed off.
Second, drying as much as possible.
Third, pulling out some spare stick-on vinyl tiles that were left by the previous owners in the basement. I eye-balled it on measurements by laying out the whole tiles first, then marking on the others with a pencil where to cut for notches and measurement.
In the end, not perfect, but a far sight better than what it was. I will likely reinforce the tiles with hot glue for now. I plan to later tear out the bottom and replace it completely. But, for now, it will Simply Do.
So, in most areas of the U.S., the occasion for fireworks is usually just on July 4th. Sure, people do some on New Year's Eve, but usually, it's just the 4th of July that you buy copious amounts of fireworks.
Well, it's a little different in Utah. We do celebrate the 4th with many, many fireworks shows. However, we also have the 24th of July and then we have our individual city celebrations during the summer. The 24th of July is Pioneer Day, to commemorate when the pioneers headed west and settled the Salt Lake Valley. The whole of Utah marks the occasion. The city celebrations are usually week long events that differ within each city in our area, including parades, talent shows, and yes, fireworks.
We're just a bunch of pyromaniacs up here.
This year, we decided to join in on the fun and loaded up on pyrotechnics. For the younger kiddos, we ended up with a large box, containing about 250 of the small boxes of poppers. You know, the ones you throw on the ground that explode and make a loud bang. They make the kids happy and keeps them away from the big fireworks. There is a downside to them, though.
They. Make. A. Mess.
Everywhere.
After sweeping a few times, I knew that it would be hopeless to clean them up until every last one was popped. So, two weeks of popping later, we finally tossed the last spent poppers. I swept and hosed down the driveway like a mad woman. And I was left with a dilemma.
These.
The popper papers like to cling to grass. A lot. My first thought was to mow the yard with the bag attached and just discard them with the clippings. However, alas, our new mower doesn't have a bag or an attachment for a bag. So, after some thought, I found myself wishing that I could just pull out my vacuum and suck it all up. I'm embarrassed to admit that it took me almost 2 hours to connect that thought with the fact that I have a shop vac.
Once that light bulb finally clicked, out came the shop vac. I vacuumed up the grass on both sides of the driveway with the hose attachment, had to clear the hose a few times because of clogs, but successfully cleaned it all up. I'm sure that the people driving by thought that my OCD was on overdrive that day. My neighbor, who just had his yard mowed and trimmed, came out with a laugh and joked that I was resorting to new measures to keep our lawn up to par with his. I also swore to myself that there was no way we would be buying those freakin poppers again, ever.
So, if you are needing a new, unorthodox method of cleaning the yard and making people question your sanity...you've definitely come to the right blog.
Paint is amazing. It is relatively cheap, comes in every color, and can give new life to your home. And if you add in some spackle before the paint, you can repair and renew many things around the house.
For example, baseboard trim. Trim can add a finished touch to any room, make it look complete. However, trim can take a real beating. From pets to kids to vacuums and mops, trim is battered on a regular basis. And it does not always bear the abuse well and can give your room a worn, distressed feel (and we're not talking the "distressed" that is the trend right now). That is the story with many of the baseboards in our home.
Our home was updated by a previous homeowner with crown molding, baseboards, and really good paint. However, that was all over 20+ years ago.
Side note with history: Our home was built by the brother of our neighbor to the west of us. It had been the site of their family barn. The neighbor is still going strong at 93 years old too. When his brother passed away, it was sold a family that lived in and remodeled the home. They then split the lot, built a new home on the back half which they moved into and still live in behind us, and sold this home to the next family. The husband of that family is the son of our neighbor to the east of us. So, we are surrounded by the former owners/family of former owners of our home. That is incredibly handy when things pop up around the house...like needing to know where the AC supply line is and when you find two wedding rings in a basement drain and you need to track down the owners. I love a home with history.
Back to the topic at hand...trim. I will never claim to be an organized woman, that's just the truth of things. So, I do not have a before pic of the area I worked on. I do, however have this pic of a different spot of trim in our foyer that has seen just as much abuse (maybe more) as the trim in the kitchen that I painted.
This may even be a flattering pic compared to how these babies look in person. But you can see the dents, dings, chipped paint, scratches, and general distress of the wood trim. So, what's a girl to do? You pull out some spackle, some primer, and some paint and get to work.
First, prep work. Very important. DON'T skip this step!
Take a wet rag and a little soap and scrub those babies down. You will not be able to get them all clean, that's why we are doing all this. But you do need to get off as much dirt and grime as you can or the paint job will not look good or last long when you're done.
Next, take some joint compound (a.k.a. spackle) and start filling those nail holes, dents, and chips the best you can. Don't worry about putting on too much over the damaged areas, you'll be able to sand it down later. If you have any cracks/spacing where the molding meets in the corner, spackle is great for filling in those gaps and making it looks smooth and joined. Sawdust Girl has a great tutorial for that. Note: I like the spackle that goes on pink and turns white when it's dry and ready to sand.
After it's dry, take some sandpaper in the 120-220 range. The lower the number, the tougher the job it is for. You don't need a strong grit for this, especially if your trim has a lot of detailing. Sand the areas of repair until the spackled areas are flush with the trim and blend in. Then, wipe down with a damp rag to remove dust and vacuum floor area.
Before opening any paint cans, you need one last step. Taping. I LOVE Frog Tape.
I have tried a few different brands; blue painter's tape, Scotch brand, masking tape. None of them performs as well as Frog Tape. Place the tape along the wall as close to the trim as possible. Make sure the tape seal is tight to the wall to prevent "bleeding". Then, do the same on the floor below the baseboards. I also like to put a drop cloth on the floor in case of drips from my brush.
Next, primer. I know that most paints come with the primer mixed in already. However, if you are painting over spackled areas without doing a separate primer first, the areas will "bleed" through the paint. What you will get is spots that are duller looking that the rest of the wall or trim you painted. I learned this the hard way after filling a thousand holes in my son's walls (the previous child must have had a fondness for posters), not priming, and painting, only to be able to see every repair through the paint. His walls looked like they had a rash when the light hit them right.
I prefer to do two coats of primer on any surface and I prefer Kilz primer paint.
Finally, the paint! Yay! I like to do 2-3 coats of the paint. It bothers me a lot to see anything showing through the paint. So, I load it up. Also, when painting trim, streaks sometimes show in the finished product. This a result of brushing over paint that has already started to dry. Paint actually dries pretty fast. So, there are two options. You can load up your brush with paint and brush toward the spot you just painted, not away, and paint an area before it starts to dry.
There is also an additive you can mix into your paint that helps extend the dry time and gives the paint time to "even out". Floetrol is for latex paint and Penetrol is for oil-based paint.
I have tried both options and they seem to work identically if I am careful in loading my brush and painting quickly. If you get interrupted a lot, the additive may be the way to go.
After the paint is dry, about 2-3 hours, you can remove the tape carefully. Be aware that some spots may still be damp. If the tape sticks and looks like it will pull the paint, I use a box cutter razor or sharp pocket knife to cut along the seam for easy separation.
And, there will always be a small setback of some sort...spilled paint, uneven edging, or leaving the tape on for over a week until you get around to painting and then the tape takes off some wall color when you remove it.
Such is life. Just have to pull out that wall paint and touch it up. Cause that's how we roll in life. We Simply Do.
Yeah, that title should give you a hint of how the budget project is going. First, the good, then, the bad.
Good - I have been keeping all my receipts to track our spending. Bad - They are all sitting in a purse, not making much of a difference since they aren't being put into our budget spreadsheet. Good - I have been able to reduce and cancel some expenses to lower our bills. Bad - I am still not able to cancel one particularly pricey subscription and we are still uncomfortably tight on money after bills are paid. Good - We were doing great with curbing our extra spending when we realized how many little things we buy. Bad - That lasted for about a week and now, I'm pretty sure we are being as careless and mindless as before. Good - (Because there is no way I'm going to end this on a bad note.) I am still determined to master this part of our life. I will be going through the last couple weeks of spending tracking and renew my efforts.
So, that is our progress in a nutshell. On a more positive note, I will be posting about my latest paint project...finishing the last paint touches on the kitchen walls and trim.
Here I sit on at the end of a relaxing Sunday. I managed to handle a few church meetings, the primary kids, a restless kiddo of my own, a yummy dinner and dessert, and even managed to sneak away for a nap...all with the hubby at work today. I don't know how I managed to get so lucky to survive all that, AND also get some much needed rest.
I knew I wanted to blog today and my first thought was to do an update on the budgeting, which is some good and some bad. However, it didn't feel right to post about money on Sunday. Even if you aren't religious, I think Sunday is still a day to rest and relax before starting a new week.
So, I thought I might share a few things that I have enjoyed seeing over this week.
First, let's get the heartwarming, tearjerker vid out of the way:
And the one that will make you think:
Aaaaand, one to make you laugh:
FYI..."Heads Up" is a fabulous app game for family nights. While you are hilariously acting out things, the phone records it all and you can play it back for laughs.
These yummy-looking Soft Glazed Pumpkin Sugar Cookies from Lauren's Latest, that make me look forward to a cool Fall.
And, finally, I would be remiss to not introduce to you an amazing DIY blogger, Kit, the DIY Diva.
She is my DIY inspiration, especially when I feel a job is too big for me to do. She jumps in and gives it everything she's got...and has lived to tell the tales...and most of them are freaking hilarious.
I hope you had a blessed and restful Sunday and that you will have a productive, fun week. Adios.
Have you ever found yourself in a situation where your first instinct is to panic? That was me this morning. I woke up, headed to the kitchen, bleary-eyed, and stopped halfway there to a small pool of water on the floor of the foyer and a dripping sound overhead.
Nothing like this to wake you up right away.
Yep, that's a bubble. And water dripping right out of the light fixture.
That was when that panic set in. The hubby wasn't home so the easy solution of having him inspect and fix it was out of the question. So, what does any woman do in this situation?...Call her daddy. Actually, my first thought was that I need to shut off the source of the water and drain the ceiling. But, I definitely needed to verify all of this with someone that knows a lot more than me.
So, I texted my dad who assured me that I was on the right track. After noticing a large pool of water on the roof, under the swamp cooler, I knew which valve to turn off. It is the water supply line for the swamp cooler. It's hidden under our basement bathroom sink. Note: If you don't know where all of the shutoff valves are in the house, learn right away. You never know when your ceiling may start to drip into your cereal and you have to shut off the water in a hurry.
After turning that all the way off, I took out my stepladder, laid out some large bowls, and slowly poked small holes into the ceiling where the water was creating a bulge. The water started pouring out of the holes into those bowls like a faucet.
Ewww, right?
With the damage contained, I knew I needed to now inspect what the problem was. So, I texted the symptoms to my dad and he let me know that it was likely that the float in the cooler had malfunctioned. Having no idea what the float was or what it would look like, I did what any novice would do...I Googled it. And I came up with this video:
Ok, I was on my way to learning. Facing a 90+ degree day, I pulled out my large ladder and climbed atop the roof. Now would be a good time to mention that I have a problem with heights. Not a deathly fear, but more of a shaking all the way up and down the ladder until I could firmly sit my butt down on the top kind of fear.
I knew how to open up the swamp cooler because I watched my husband change out the pads last year. At this point, I yelled to my daughter to grab my phone and take a few pictures. As long as I was going to be up there taking apart the AC, I might as well blog about it later. I mean, this is that whole "learning" part of things that I mention in the title of my blog, right?
The problem was not hard to find. The float was COATED in calcium, lime, and rust! The arm of the float didn't even move up and down until I smacked gently removed the build up.
But something was still wrong. When I moved the float upward, the water from the supply line would still drip. Not as much, but still dripped. Normally, a float will do just that, float on top of the water that the water supply line feeds into the cooler. If the pan fills too high, the float will rise with it and trigger the supply line valve to close, shutting off the water. But this was not working and, with the cooler having been off all night, the pan filled to the top and spilled over onto the roof, where it pooled on the roof and soaked through into my foyer.
Also, usually, a roof can stand up to this pretty well and will not always leak. However, after we moved in, I noticed some paint and wall bubbles in the foyer closet, indicating that there was a leak before. So, that part of the roof was already damaged. The leak today reaffirmed that we will definitely need to be replacing that part of the roof in the near future.
After seeing the calcified state of the float and that there was a cap that had fallen off from disintegration, I headed to Ace Hardware up the street. I took a LOT of pictures with me on my phone and the broken cap because I didn't know if floats are something that come in different sizes, types, etc. Thankfully, they are pretty standard. I bought a new float and a bottle of Limeaway for the rusted nuts and bolts of the old float.
Back up the roof with a little less shaking. Note: asphalt shingles get HOT in the summer. Take care when lifting yourself on the roof...use gloves. Ouch.
Some prying, light hammering, and the use of pliers. I got about half of it all disconnected.
Cue the hiccup. There's one in every project/repair. The main assembly was so rusted, it had bonded to the cooler housing...and it did NOT want to break up with it. We're talking Taylor Swift kind of clingy.
So, thanks to the magic of previous Pinterest reading, I filled a ziplock bag with Limeaway, wrapped it around the part that was aggravating me being difficult, zipped it up and clamped it to the unit with my wrench. Wish I had taken a picture of that, it looked so high tech design.
1 hour later.
Back up the shaky ladder for the 10th time. (I swear the ladder was shaking with nerves, not me.) The good: There was progress because I could rotate the assembly with a wrench. The bad: the nut was still solidly rusted, and just turning along, firmly attached to the rest of it.
My awesomely awesome neighbor came home shortly before and headed over to see if I needed help. After we weren't able to unscrew it, even together, he brought over his sawzall. It is an electric hacksaw and it sliced through that old float assembly like he was cutting through thick bread. 10 seconds and it was off. All I could say, other than thanks, was that I had to get myself one of those. Tool envy...it comes along quicker than you expect once you start doing this stuff yourself.
The new float screwed in quick and easy. We adjusted the angle of the float, I turned on the water supply, and tightened it all down. Success! It poured out when the float was down and shut off when the float was up. It was all good. I put the panels back on and turned on the cooler. No leaks, no problems.
The only thing I was worried about was that the sound of the water pouring into the unit was louder than usual. I knew that the small hoses that wet the pads might not be in the exact right spot when I closed it up. So, I saved that one last task for my husband when he got home. I couldn't keep all the fun to myself, right?
So, the cooler works, the ceiling is drained and drying, and I now have a new skill that I certainly didn't realize I would need when I woke up this morning. Or at least, not until the water started dripping on my head.
What did I learn?
1. Don't panic.
2. Minimize/Contain damage by shutting off water, laying out towels and bowls.
3. Calling for help is always ok. Doesn't make you any less competent. Same with Googling things. And being stubborn about doing it all yourself may just make things worse.
4. Assess the symptoms and go explore possible causes of issue. Don't be scared to climb up the ladder, pop open an appliance, or unscrew a panel to take a closer look.
5. Take lots of pictures and/or notes. These may help someone at the hardware store to find what you need and they usually have a lot of helpful advice too.
6. Do your best and let others help. Oh, and take lots of pictures to brag with later.
I can't fully explain the awesome feeling you get when you have taken on a task that seemed huge and you end up dominating it, owning it, conquering it. It makes you feel like a power tool-wielding, butt-kicking DIY-er. I was beaming when the neighbor across the street asked if that was me he saw up on the roof earlier and he gave me a thumbs up.
I have never been good with budgets. They felt constricting, confusing, and impossible with the many demands of life. And most of my life, they have not really been necessary (or so I thought). However, life changes, things happen, income fluctuates.
Without writing the length of a novel, suffice it to say that about 5 years ago, we found ourselves out of work, short-selling our home, and moving through three states in a two year period to try to provide for our family. It was hard, frustrating, and resolve-building. With the help and love of family, we got back on our feet and have managed to buy a home in a beautiful area, with our kids settled in and life resuming a normal pace. Needless to say, we don't want to be back in the same situation. And since we are expecting a decrease in income in the next few months, we decided to take action.
Cue the budget.
Without a clue how to start, we visited a friend that is "passionate" (his word, not ours) about budgeting. He has a growing family of a wife and three beautiful kids and, as the sole provider, knows the importance of tracking their money. So, he set us up with some simple excel spreadsheets, a debt reduction spreadsheet, and a book that he orders in bulk and gives away to anyone that would benefit from it, "The Four Laws of Debt Free Prosperity" by Blaine Harris and Charles Coonradt. The book was published in 1996 but is still as relevant today. Our friend reads it over and over to remind himself why this is all important.
So, armed with a little knowledge, the excel docs, and this book, we headed home and started our adventure. We listed our income, bills, etc. then jotted down our goals. Goals are essential. I have never been a big believer in writing down goals but am starting to see the importance of it. The book states that a goal that isn't written down is just a wish. Well, I'm tired of just wishing. Goals: (a sampling) 1. Become debt-free. 2. Live beneath our income. 3. Save for life's memorable events...missions, weddings, kids' college, family trips. 4. Own a business(es).
We then managed to read about 43 pages into the book before calling it a night after 1 a.m. It is told in first person and is the true account of a man that was so far at the end of his financial rope and hope that he seriously considered doing himself in. It was a chance midnight meeting with a neighbor that started him down the path where he found financial peace and freedom, and a lot more happiness in his family life.
We now have a to-do list, as well: 1. Cancel unnecessary/frivolous/unused subscriptions. (1 down, 2 to go) 2. Negotiate smaller bills/plans with internet and cell phone. 3. Track ALL spending. Keep all receipts and enter into excel doc. (It has begun. This journey began at Walmart this morning.) 4. Monitor bank accounts on a regular basis. I am someone that will not look at the account for long periods because I know that I will not like what I see.
So, this is just the beginning. I am determined to gain control over this area of our lives.
It will be tough sometimes, especially until we get it down to routine. This morning, I had to walk through Walmart with my eyes glued to the floor until I got to the milk aisle. I also almost stopped on the way home because I saw a sign for a kids' stand selling sodas for $1. Thankfully (?), there wasn't anyone around that I could see, and believe me, I looked. Did I mention that I gave up caffeine again, starting today? I wonder if that will affect anything? :)
I know many others are struggling with money or don't realize yet that this is a necessary thing, so I will do my best to share all I learn with you. But definitely, start with this book. Happy Budgeting!
I am a woman that loves God, my family, DIY, and Mixed Martial Arts, among other things. I try to push myself to do new things and learn new skills. It's a personal challenge to myself. But the best way to learn is to SIMPLY DO.